
Everything on this page lives under Settings in the sidebar, inside Account and administration. Permissions are checked per action: viewing a section grants no access to change it. Workspace identity and module settings may require different permissions.
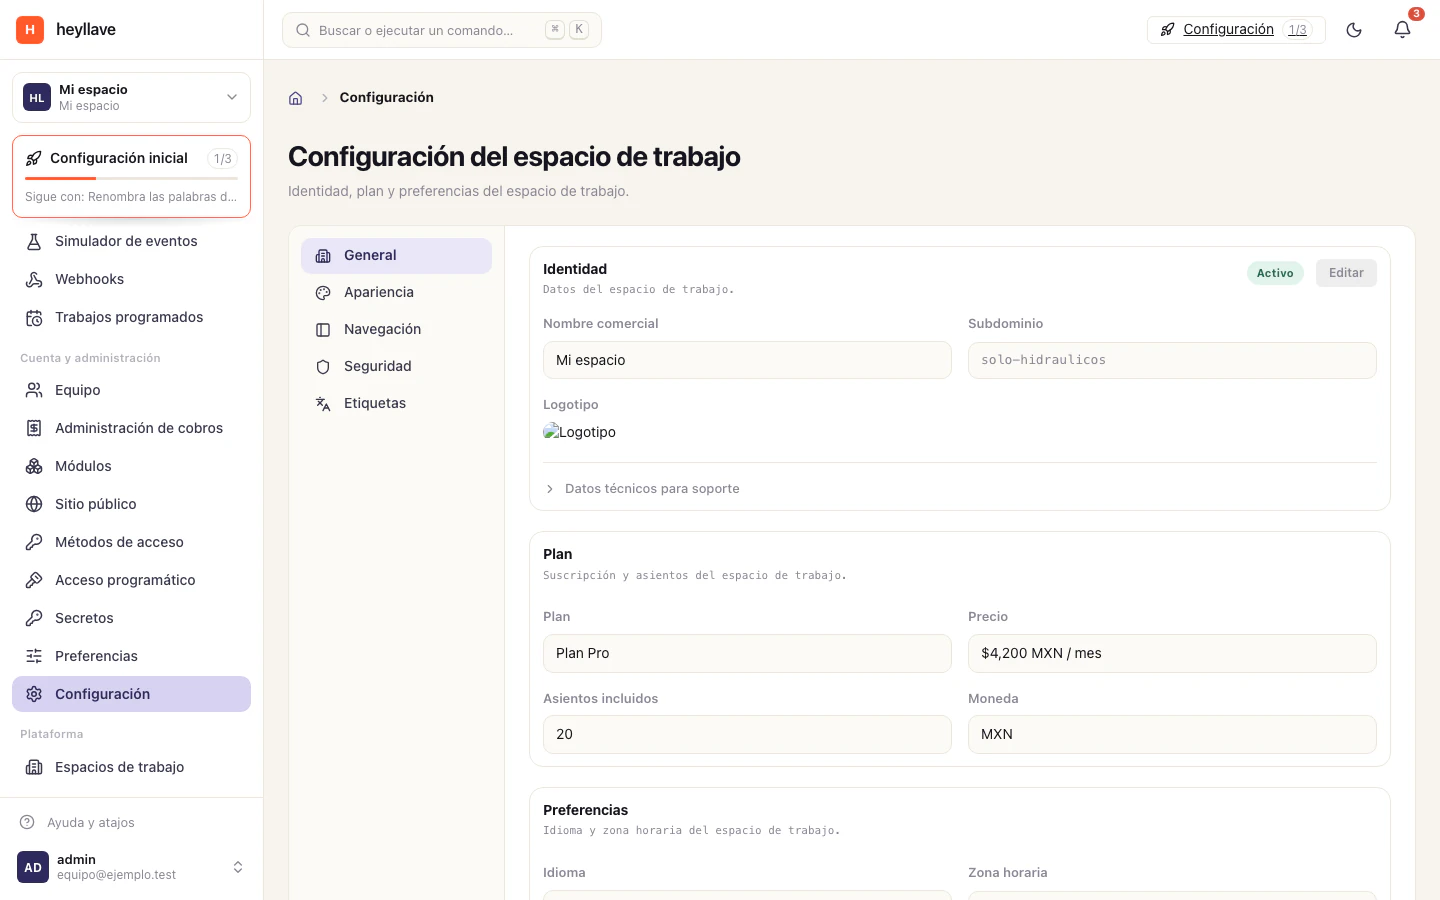
Identity
Settings → General → Identity| Field | What it is for |
|---|---|
| Business name | Your business’s name. It appears in the sidebar, on documents and in invitations. |
| Subdomain | Your workspace address: your-business.heyllave.app. Shown read-only. |
| Logo | Shown in the sidebar and on the documents you generate. |
Under Technical details for support there are two internal identifiers. You only need them if Heyllave support asks for them.
Language and time zone
Settings → General → PreferencesSet the language and time zone for the workspace. These are the reference values for screens and processes that use the business’s shared configuration.
Each person can have their own under Preferences; the workspace value is only the starting point.
Appearance and navigation
Settings → Appearance- Default theme — light, dark or the system’s. It is what your team sees until they choose their own.
- Accent color — a
#RRGGBBvalue. Leave it empty to use the system color.
There is a preview on the same screen. Only administrators can change it.
Settings → NavigationHere you decide how the sidebar looks for the whole team:
- Hide entries your business does not use.
- Rename the ones you use to something else. If your business says “Services” rather than “Orders”, change it.
- Reorder by dragging.
- Add your own links to a route in the workspace.
Custom labels
Settings → LabelsIf your business has its own vocabulary, you can override the text of any product label here, per language. Useful when “Customer” is really “Patient”, or “Technician” is “Adviser”.
There is also a translation catalog for reviewing every resolved key, filtering them, exporting them or replacing them in bulk.
Module settings
Settings → ModulesEach enabled module brings its own switches. The most used ones:
| Module | Setting | What it does |
|---|---|---|
| Work orders | Time tracking | Record the hours worked on each order. |
| Work orders | Checklists | Attach task checklists to each order. |
| Work orders | Crews | Assign whole work crews rather than one person. |
| Work orders | Priorities | Enable priority levels per order. |
| Work orders | SLA | Track resolution deadlines, with default target hours. |
| Work orders | Auto assignment | Distribute work round-robin or by workload. |
| Invoicing | Default tax | The rate applied to new invoices. Entered as a percentage. |
| Catalog | Inventory tracking | It saves, but the server does not read it: tracking is set per item. |
| Bookings | Release the slot when choosing another | Cancels the previous hold as soon as the customer picks a different time. |
Security
Settings → SecurityThis section gathers the workspace’s access options, and they are separate from your personal account settings. Which controls you can change depends on your permissions; ask whoever administers the workspace if you need help.
Danger zone
Settings → General → Danger zoneDeleting the workspace. When you confirm it:
Stops working: access for the whole team (including yours), API keys, webhooks, connected integrations, the public portal and any shared link.
Is retained: your information — support can reactivate the workspace — along with the audit history and invoices already issued.
There is an additional checkbox, Also delete all data, which removes everything permanently. Neither you nor support can recover it. To enable the button you have to type the workspace’s exact name. Closing access and permanently deleting data have different consequences; do not pick permanent deletion when you only need to stop access.
If something doesn’t work
Permissions are checked per action: viewing this screen grants no access to change it, and workspace identity, appearance, navigation and modules may each require a different permission. If a change will not save, check the permission for that specific action. The subdomain is read-only for everyone, so do not try to solve it with a role.